
 4939
4939
Create schedules and smart rules based on specific time, week day, range, or sunset and sunrise. When things happen automatically, that's one less item on your to-do list.
Here are a few examples of scenes and automations when something happens based on a time trigger.
Scene structure: At a specific date, time, or during a time range perform an action.
Time-based triggers and conditions:
- Time interval (trigger): choose a particular date, time, and duration (number of hours or minutes) for the action to take place
- Once (trigger): choose a particular date and time for an action to occur only once
- Days of week (condition): choose the days of the week you want the action to occur based on any other existing triggers
- Days of month (condition): choose a particular day of the month (or the last day of any month) for an action to occur
- Time range (condition): choose a range between one time of day and another for an action to occur based on any other existing triggers
- Date range (condition): choose a range between one date and another (day and month) for any action to occur based on any other existing triggers
- Sunrise & Sunset (trigger): choose either sunrise or sunset as the time triggers for your action to occur (if you need thing to happen between sunset and sunrise, scroll down to the last scene example to learn how to create a variable for this condition)
- Exact time (trigger): choose a particular time of day for your action to occur
Some blocks can only be used as triggers, some only as conditions, and some as both. Triggers will activate the scenes or they will check the rest of the conditions and triggers if present. Conditions will not activate the scene but they have to be met before the action gets executed.
The Z-Box Hub uses the basic logical designations to help you build advanced automations and rules. Here is what they mean:
== EQUALS
!= DOES NOT EQUAL
< LESS THAN
<= LESS OR EQUAL
> GREATER THAN
>= GREATER OR EQUAL
How to create a time triggered scene
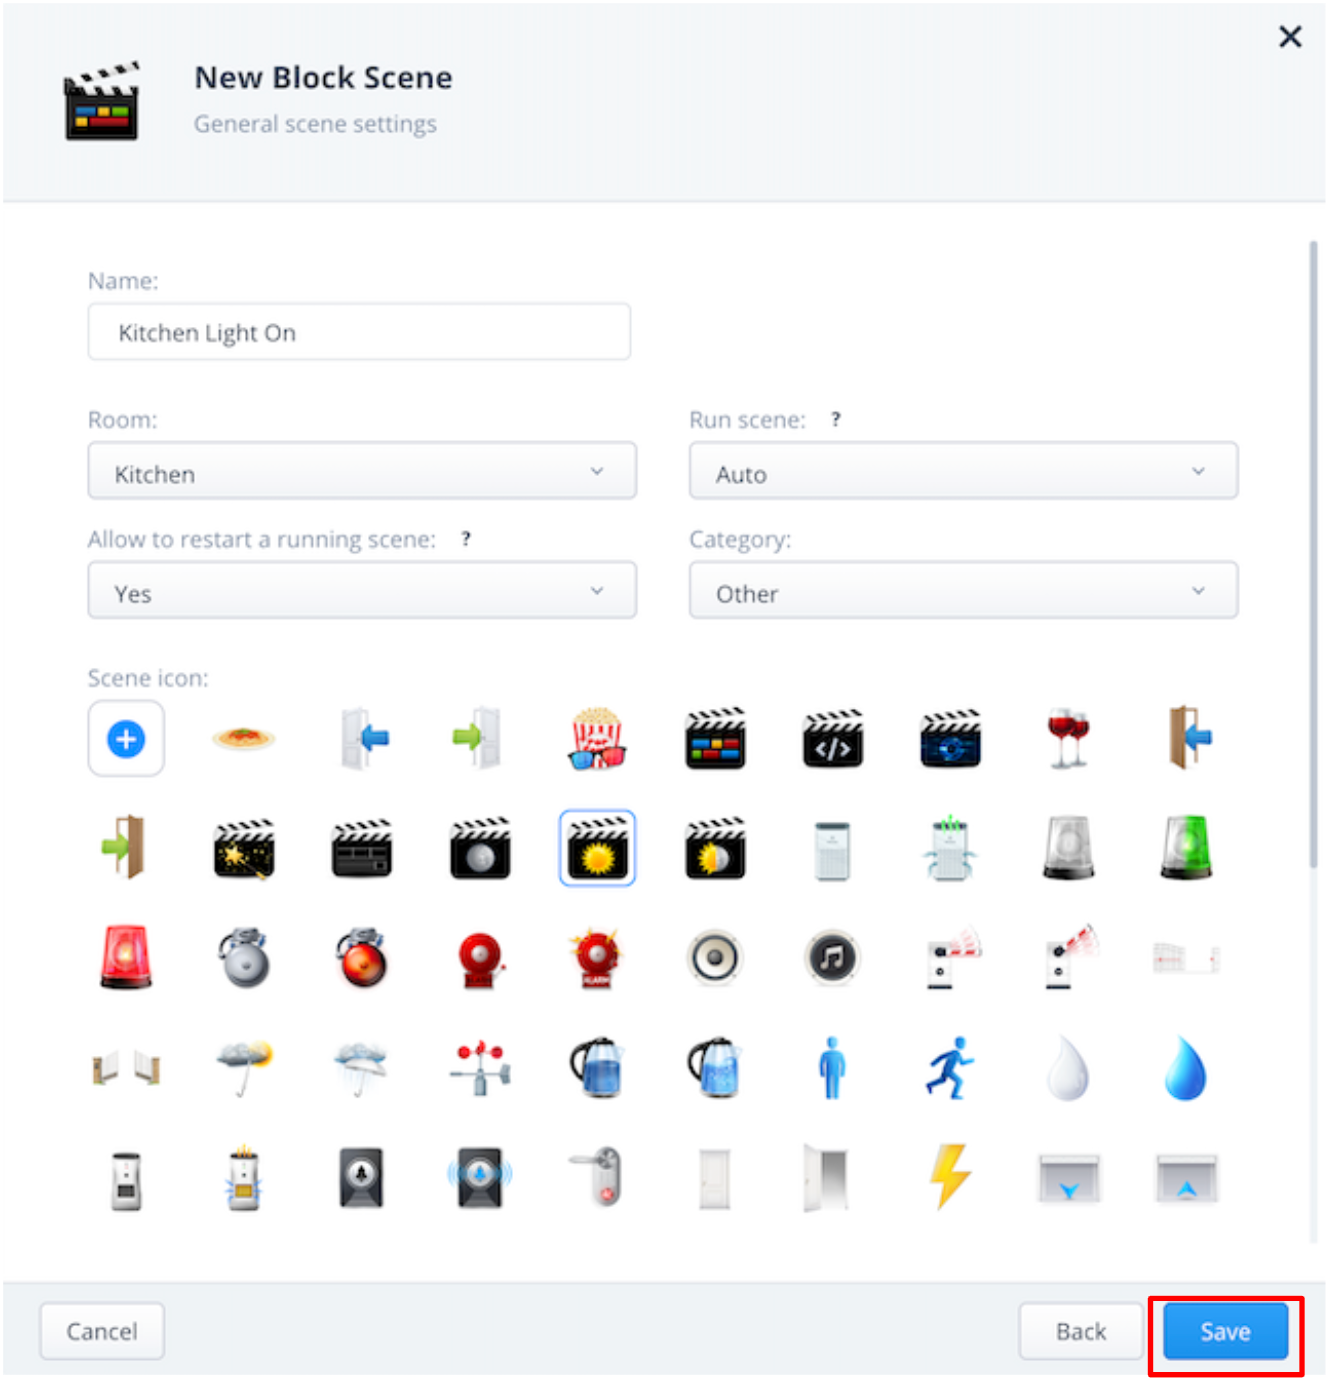
1. From the sidebar navigation menu of the Z-Box web interface, go to Settings by clicking on the gear icon.

2. Click on Scenes.

3. Click on Add Scene.

4. Select Block Scene.

5. Provide the basic scene information (name, room, category, etc) and click Save. Make sure you select Auto under the Run scene section for any time triggered scene, otherwise it will not run.

6. Now you are ready to create your scene using the building blocks. For time-triggered scenes click on Time on the trigger/action menu and drag and drop any of the available blocks to the Triggers and Condition section of the scene-building area.


7. Once you specify the trigger and conditions, you will have to specify the action(s). Simply drag and drop other available blocks such as Device or Notification to the Action section.

8. Click Save to save your scene.
Sample Time Triggered Scenes
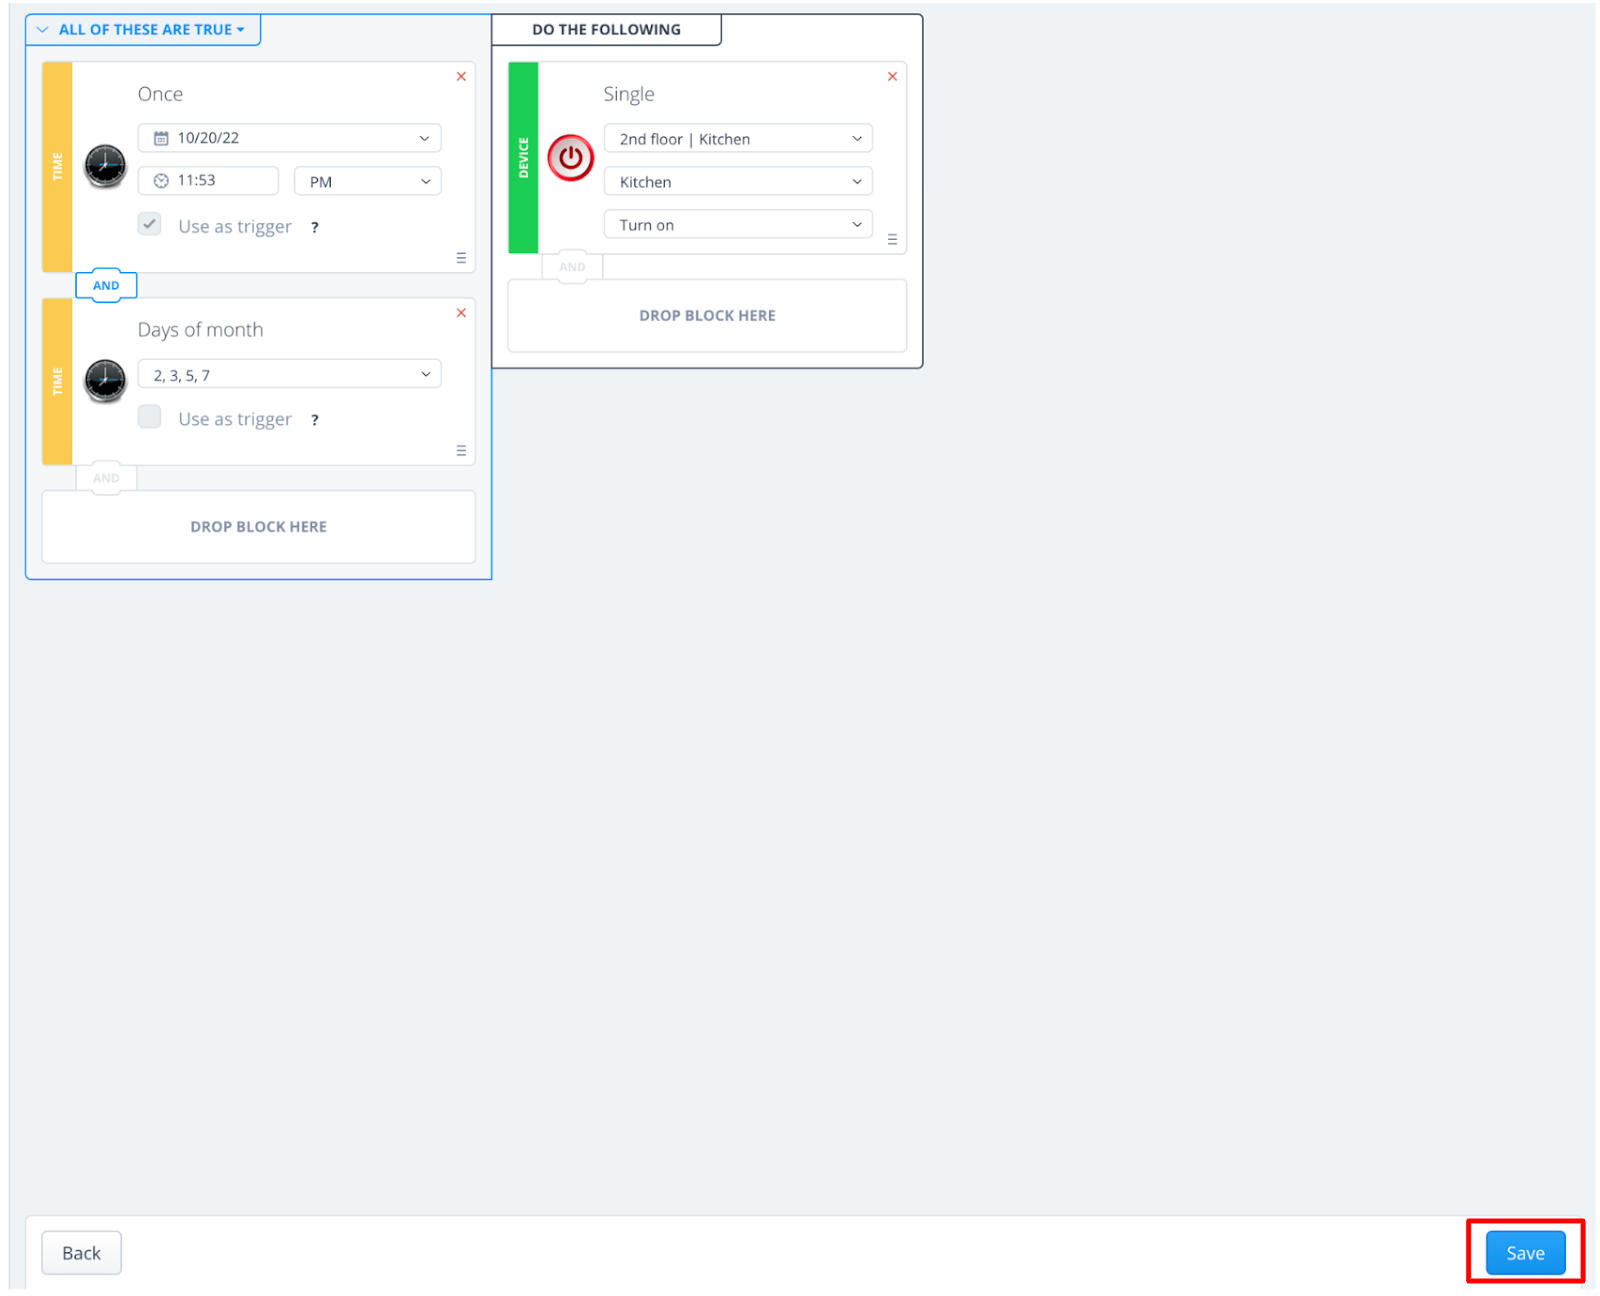
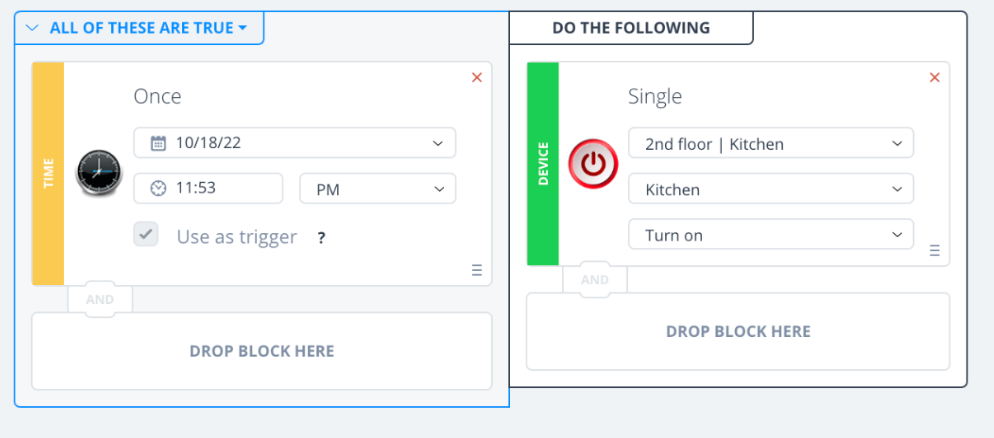
Scene 1: Execute a specific action just once.
Trigger Type: Once (Set the exact date and time for running the scene)
Trigger(s): On 10/18/22 at 11:53 pm (this is how late we work to get this documentation completed for you all)
Action(s): Turn on the Kitchen light (to let us know it's time for a snack)
The scene will run: Once (we don't want this to become a habit)
Scene 2: Run specific action every x seconds, minutes, or hours starting at a specific day and time.
Trigger Type: Time interval (Set the start date, start time, and frequency of running the scene).
Trigger(s): Staring on 10/18/22 at 9:00 pm (getting ready to work late nights).
Actions(s): Turn on the Kitchen light (time to stretch and hydrate).
The scene will run: Every 20 minutes (if we need to make it a habit, trying to make it a better one).

Scene 3: Add Condition to Scene #2
Trigger Type: Time interval (Set the start date, start time, and frequency of running the scene) and Days of the week (select days of the week on which the scene will run).
Trigger(s): Staring on 10/18/22 at 9:00 pm (can't avoid working late).
Condition(s): On Monday, Wednesday, and Friday (but desperately trying to get some sleep back).
Actions(s): Turn on the Kitchen light (to stretch, hydrate, and snack occasionally).
The scene will run: Every 20 minutes on Mondays, Wednesdays and Fridays only (Tuesdays and Thursdays are for rest and maybe some Netflix).

Scene 4: Add Delayed action to Scene #3
Trigger Type: Time interval (Set the start date, start time, and frequency of running the scene) and Days of the week (select days of the week on which the scene will run).
Trigger(s): Staring on 10/18/22 at 9:00 pm (definitely working late these days).
Condition(s): On Monday, Wednesday, and Friday (trying to balance it out).
Actions(s): Turn on the Kitchen lights, and 15 seconds later turn them off (it's a quick break, don't start looking for that old peanut butter jar from the pantry).
The scene will run: Every 20 minutes on Mondays, Wednesdays and Fridays only (and then... TGIF!)
To learn step-by-step how to add delay to the action, click here for more instructions.

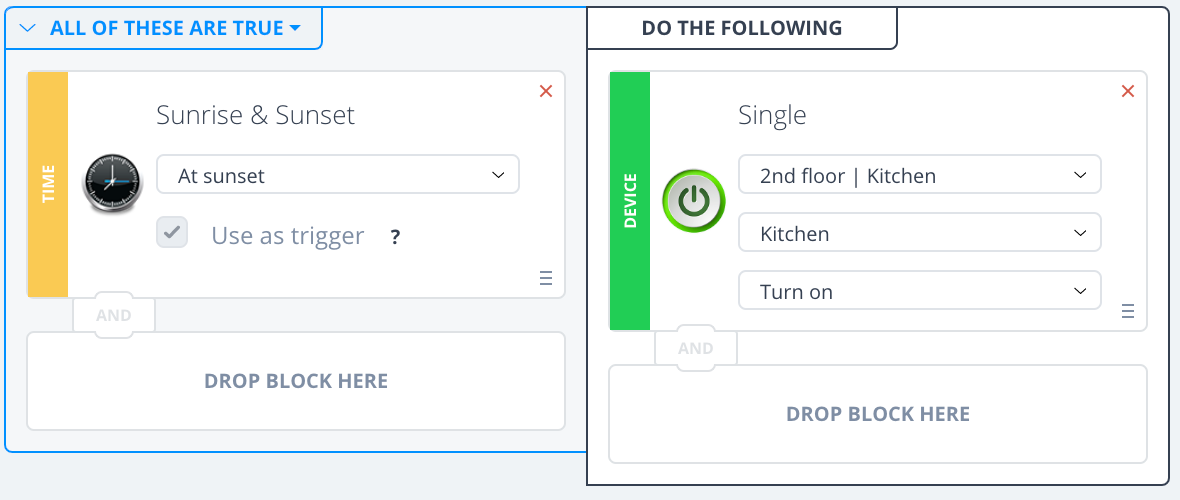
Scene 5: Sunrise & Sunset single device automation
Note: Make sure your location is defined properly for accurate sunset and sunrise time readings. To confirm your location, simply navigate to Settings > General > Location.
Trigger Type: Sunrise & Sunset (Select if the scene should run before, at, or after sunrise or sunset.)
Trigger(s): Sunset (it's daylight savings time again and it's dark by dinner time).
Actions(s): Turn on the Kitchen lights (so we can make dinner with the lights on).
The scene will run: Every day at Sunset (because we cook balanced meals every night).
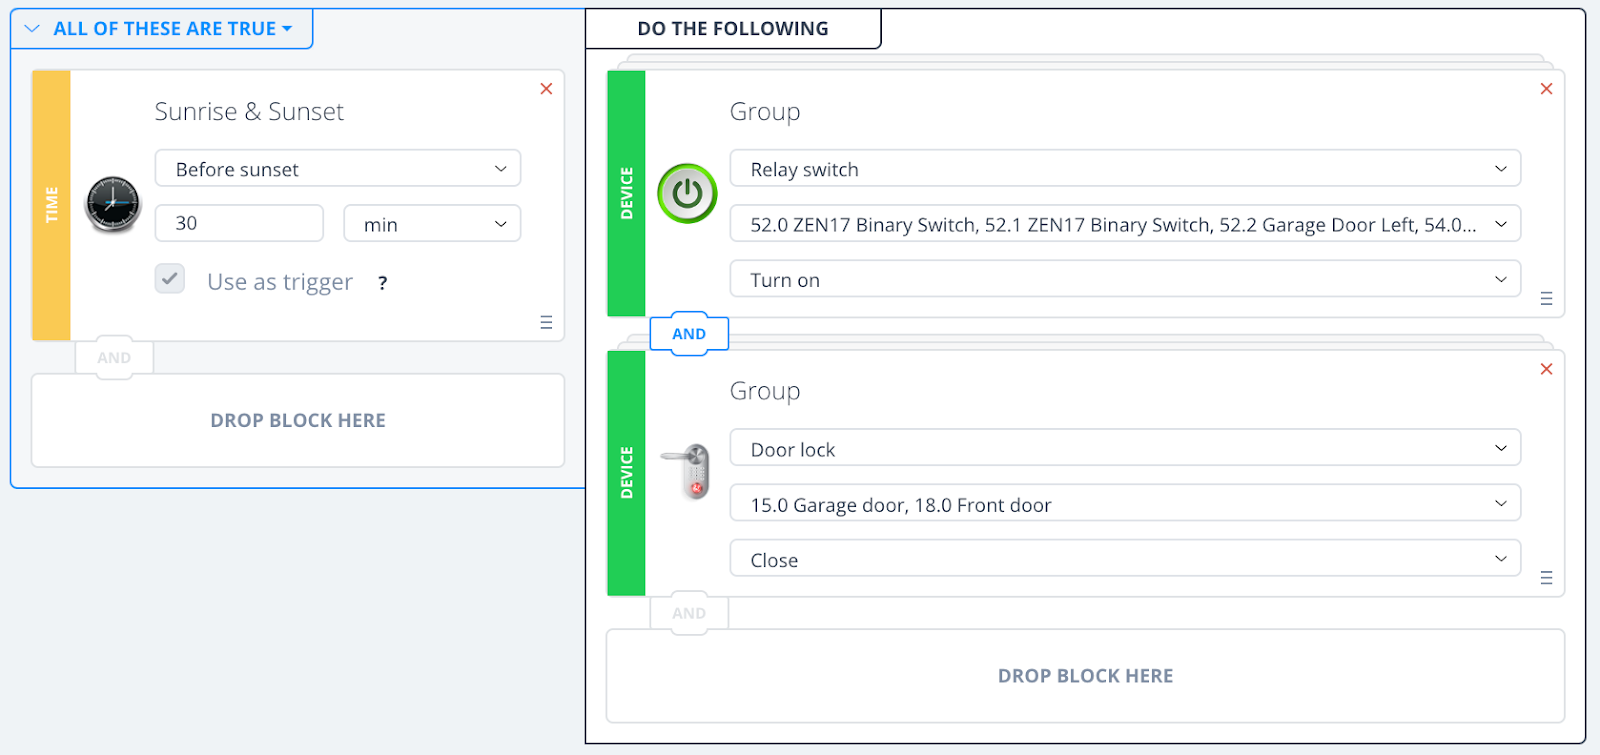
Scene 6: Sunrise & Sunset device group automation
Note: Make sure your location is defined properly for accurate sunset and sunrise time readings. To confirm your location, simply navigate to Settings > General > Location.
Trigger Type: Sunrise & Sunset (Select if the scene should run before, at, or after sunrise or sunset).
Trigger(s): Before Sunset (so you don't even notice the day is almost over).
Actions(s): 30 min before Sunset turn on all the lights and lock all the doors (you want to let everyone know you're home but don't want visitors because you're working late again).
The scene will run: Every day before Sunset (because you like your daily routines).
Note: To learn step-by-step how to create a scene that controls groups of devices click here.
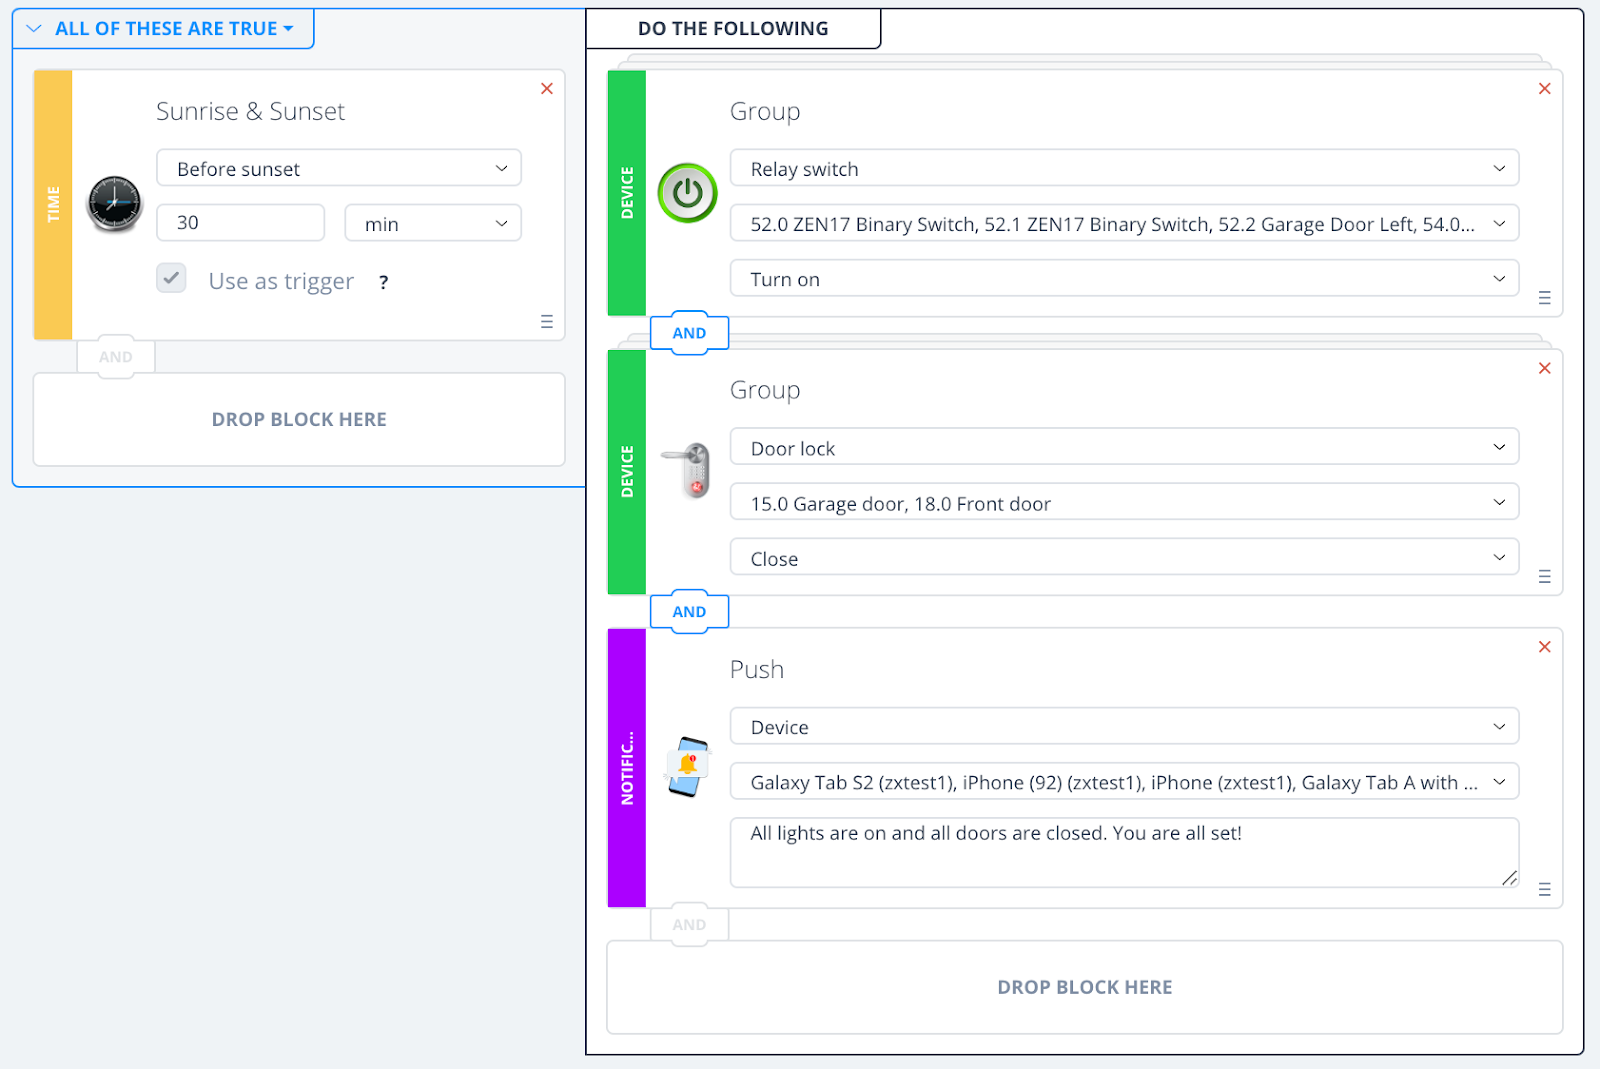
Scene 7: Sunrise & Sunset device group automation with notifications
Note: Make sure your location is defined properly for accurate sunset and sunrise time readings. To confirm your location, simply navigate to Settings > General > Location.
Trigger Type: Sunrise & Sunset (Select if the scene should run before, at, or after sunrise or sunset).
Trigger(s): Before Sunset (always plan ahead).
Actions(s): 30 min before Sunset turn on all the lights, lock all the doors, and send a push notification to all mobile app users (because you want to make sure this smart home hub actually does work when you need it to, we get it).
The scene will run: Every day before Sunset (until you realize that the Z-Box Hub just works).
Note: To learn step-by-step how to create a notification scene click here.
Scene 8: The automation runs between sunset and sunrise only
This one is a little more complex and requires us to create a variable element before creating the scene. The variables panel allows you to add, change, and check the status of global variables that can be used in your scenes. You can use variables containing numerical values or predefined variables with few states of any kind. These predefined statements allow you to create more elaborate automations.
Scene Description: Turn on the Living room lights anytime motion is detected in the living room from sunset to sunrise only.
1. First, define your variable. From the sidebar navigation menu of the Z-Box web interface, go to Settings by clicking on the gear icon.

2. You will be redirected to the Devices menu.

3. Click on General.

4. Click on the Variables menu.

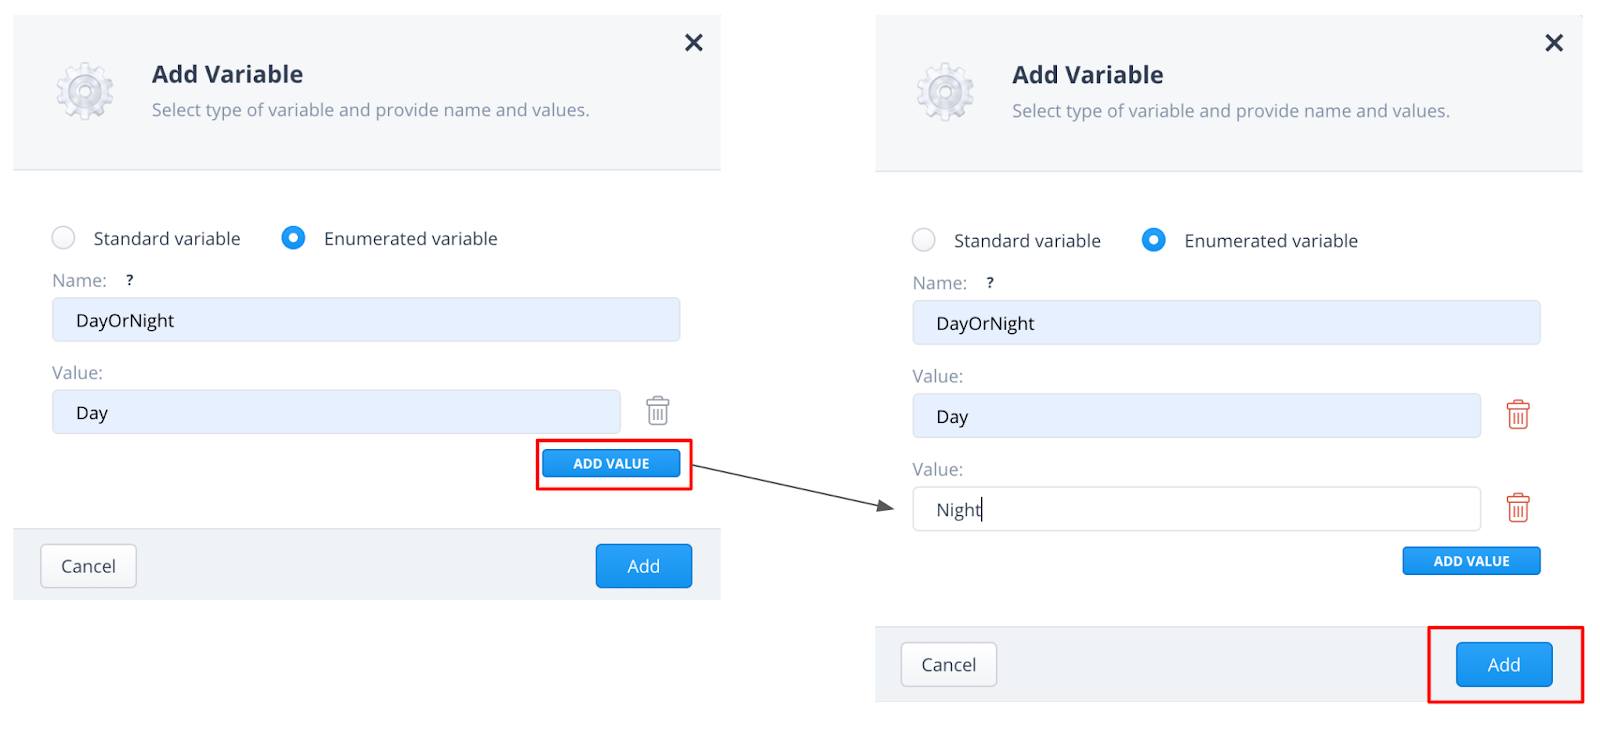
5. Create a new variable by clicking on Add Variable.

6. Click on the Enumerated variable option and proceed to define your variable.

7. Provide the name of your variable and provide all possible values by clicking on Add Value for each additional variable value. Once you provide all the values click on Add to create/save the variable.
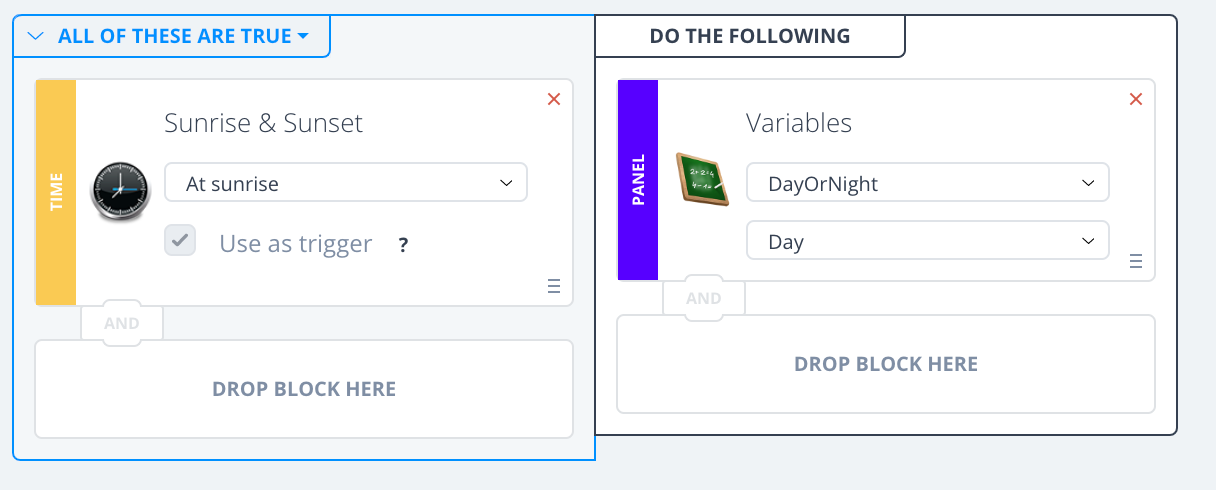
Now that you have your variable defined you will have to create a scene to assign time-specific values as triggers.
8. Navigate to Settings > Scene > Add Scene. Provide your basic scene information and click Save. The below example illustrates that at the Sunrise DayOrNight variable is set to Day.

9. Next, if you repeat the scene creation to set the DayOrNight variable to Night at Sunset.
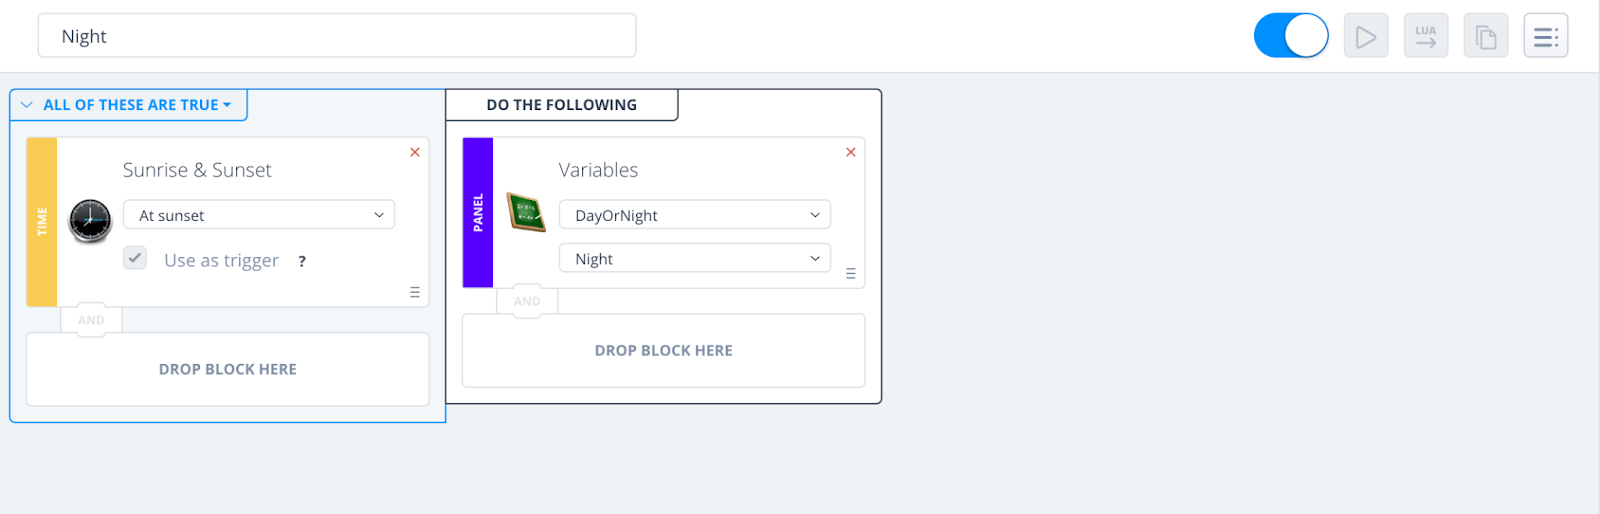
10. Now when your variables are defined and connected to sunset and sunrise, you can proceed to the automation scene creation. Once done click Save.


Please let us know if you have any questions about time triggered scenes and we'll be happy to assist you!

