
 3158
3158
Temperature schedules allow for automatic control of heating and cooling for each area of the house. This is a great way to save energy, bring the utility bill down, and increase the air quality in the spaces we spend most of our time in.
Before you can create a schedule for your thermostat on the Z-Box Hub, you will need to create at least one climate zone to manage the heating and cooling temperatures in your home or office. As usual, all programming and scheduling needs to performed in the WEB UI of your Z-Box Hub.
NOTE: As soon as you create a new climate zone, the default schedule will be pushed to your thermostats, overriding any existing settings or programs. You can review and update the default schedule prior to creating the zone (see below for How To Program Climate Zone Schedules).
HOW TO CREATE A CLIMATE ZONE
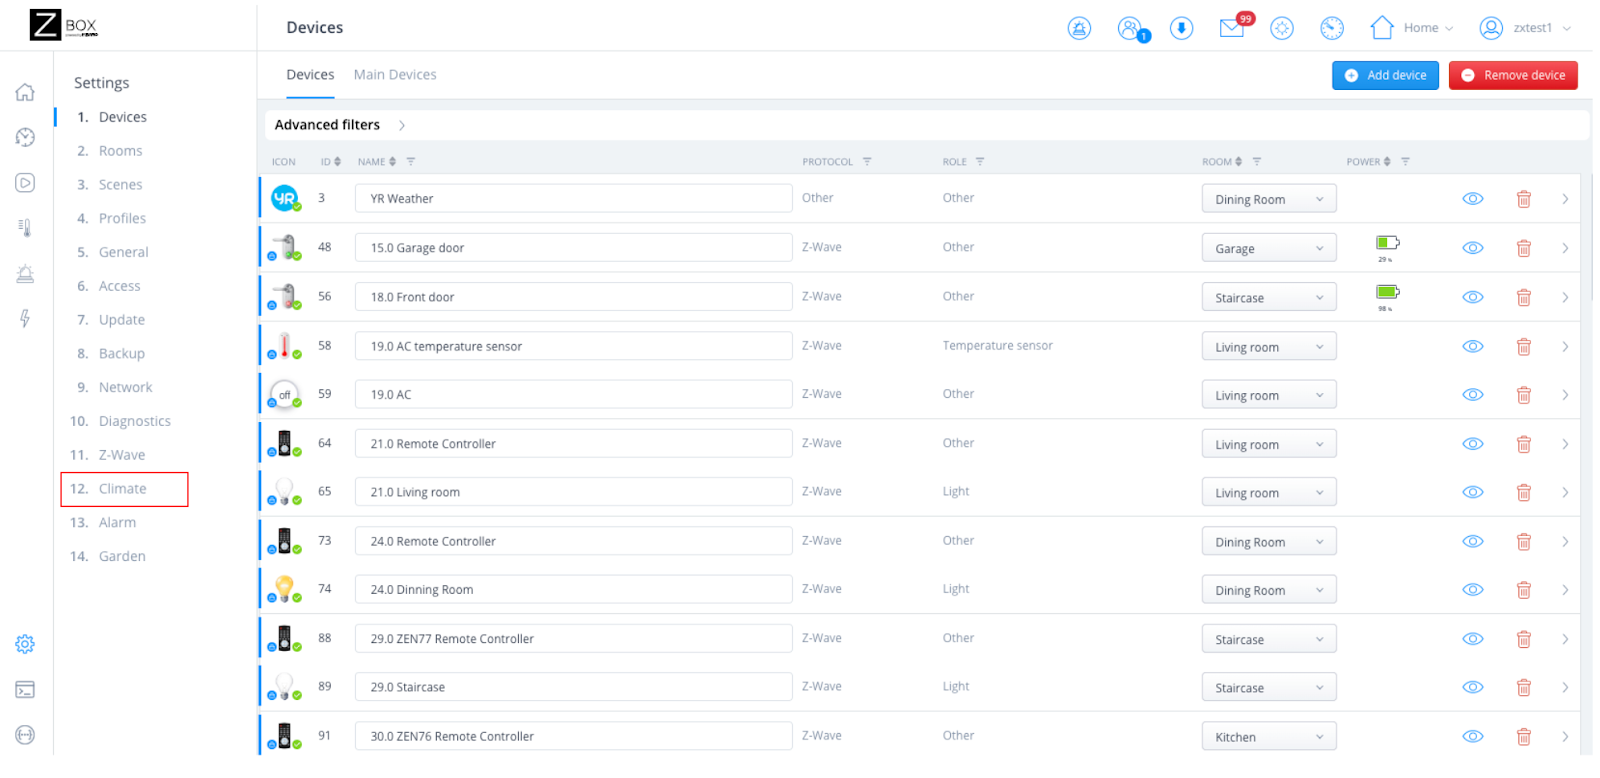
1. From the sidebar navigation menu in the Z-Box web interface, go to Settings by clicking on the gear icon.
2. You will be redirected to the Devices setting menu. Click on the Climate settings menu (number 12 in the side menu).
3. Click the Add Zone blue button in the top right corner.

4. You will now see two options to configure your zones:
- Automatically: Temperature zones will be created automatically based on the existing sections and rooms (use this option if you want each section of the house to have a dedicated zone)
- Manually: Create temperature zones manually according to the rooms you select (use this option if you want to group thermostats from different sections)

5. In our example, we're choosing the manual option to create our first zone. Once you select the option of your choice, click Confirm.

6. You will be redirected to the Climate Configuration screen where you can name your zones and select which sections and rooms will be included in the zone.

7. Once you make your selection, click the Add button to create the new zone. Please remember that as soon as the zone is created, the default schedule will be pushed to all of the thermostats in that zone and you will lose your previous thermostat programs and schedules. You can review and update the default schedule prior to creating the zone (see below for How To Program Climate Zone Schedules).

You will now see the new zone in the Climate section of the Settings:

Click on the zone to start editing the schedule (see next section for detailed instructions):

HOW TO PROGRAM CLIMATE ZONE SCHEDULES
1. If you are not already on the Climate scheduling page (shown in the last screenshot in step 7 above), navigate to Settings by clicking on the gear icon and then select the Climate submenu in your Z-Box WEB UI.

2. Click on the zone you want to view or edit the schedule for.

3. You will be redirected to the detailed schedule view.

4. First, choose the operating mode for the schedule: Cooling, Heating, Auto, or OFF.
- Heating: thermostats increase the temperature to reach the heating setpoint
- Cooling: thermostats decrease the temperature to reach the cooling setpoint
- Auto: thermostats automatically switch between cooling and heating to reach the desired setpoint
- Off: thermostats are always off

5. Click on the setpoint marks or click > to expand the view for each day.

6. Define the times at which the setpoints would change by simply moving the sliders to the desired time of day. Your changes are applied automatically to the selected mode and day.

7. Next, define the setpoint values for Heating and/or Cooling for each time interval. To change the values click +/- or enter the temperature manually. Your changes are applied automatically to the selected mode and day.

8. If you would like to set a different schedule for each day of the week, select another day to edit. If you want to copy the schedule to other days of the week, indicate which days you want to copy the schedule to by checking the appropriate boxes under the Copy schedule for section.
You can select any of the following:
- Individual days
- Working Days (Monday - Friday)
- Week (Monday - Sunday)

9. Once you make your selection, click Copy. The schedule will be copied to the days you selected.

10. Click Save to save all changes.

HOW TO EDIT CLIMATE ZONES
1. From the sidebar navigation menu in the Z-Box web interface, go to Settings by clicking on the gear icon.
2. You will be redirected to the Devices setting menu. Click on the Climate settings menu (number 12 in the side menu).
3. From the climate setting page, you can edit the names and devices included in any zone, disable or enable the zones, and delete selected zones. Please see the screenshot below on how to navigate these options:

CLIMATE ZONE MODES
There are three types of climate zone modes:
- Schedule (default): all thermostats in the zone work according to the set schedule.
- Manual: overrides the set schedule for a specific period of time (from 15 minutes to 24 hours, or until the mode is manually changed back to Schedule or Vacation with the Hold function).
- Vacation: overrides the set schedule for a specific time period.
Each zone will be visible under the mode category it is currently set to. You can view the modes in the Climate panel:


HOW TO CHANGE THE MODE FOR A CLIMATE ZONE:
1. Go to the Climate panel in the WEB UI
2. Hover over the zone tile until you see the search icon. Click on the search icon to be redirected to the zone mode settings.

3. From the Zone mode settings you can change the mode to Manual, Vacation or back to Schedule.

4. To change the mode to manual, click on the manual mode icon and override the schedule by setting the new temporary cooling and/or heating setpoints as well as the time duration for them. Once done, click Set.

5. The zone will now show under the Manual mode section in the Climate panel. Once the set time duration is expires, the zone will automatically move back to the Schedule mode.

6. If you'd like to move the zone back from Manual mode to Schedule before the set time, click the Back All to Schedule button over the Manual mode section. You will have to confirm that you want to move all the Manual zones back to schedule.

If you have multiple zones in the Manual mode and you'd like move only some of them back to the Schedule mode, navigate to the zone mode settings for that particular zone by hovering over the tile of that zone and clicking the search icon. Then click on the Back to Schedule button to move the zone to the Schedule mode.

7. To change the mode to Vacation, navigate to the zone mode settings for that particular zone by hovering over the tile of the zone and clicking the search icon. Then click on the Vacation mode icon and set new cooling and/or heating setpoints as well as the time duration for them. Once done, click Set.

You can also change the modes for the Climate zones in your Z-Box mobile app. Click here to learn how.
If you need any help with managing your thermostats on the Z-Box Hub, please Reach out to our support team.

