
 5950
5950
Create alarm zones using your smart security devices, including sensors and sirens. Based on these alarm triggers, you can program notifications, trip other Z-wave devices, and activate existing scenes.
FIRST, SET YOUR SECURITY PIN
Before you start creating and arming your alarm zones, it's important that you set your security PIN. You'll need it to disarm any armed zone. The default system PIN is 1111 and we recommend changing it before programming any alarm features on your hub. Here is how to do it:
1. From the Z-Box web interface, click on the user name in the top right corner.

2. Click on Account Settings.
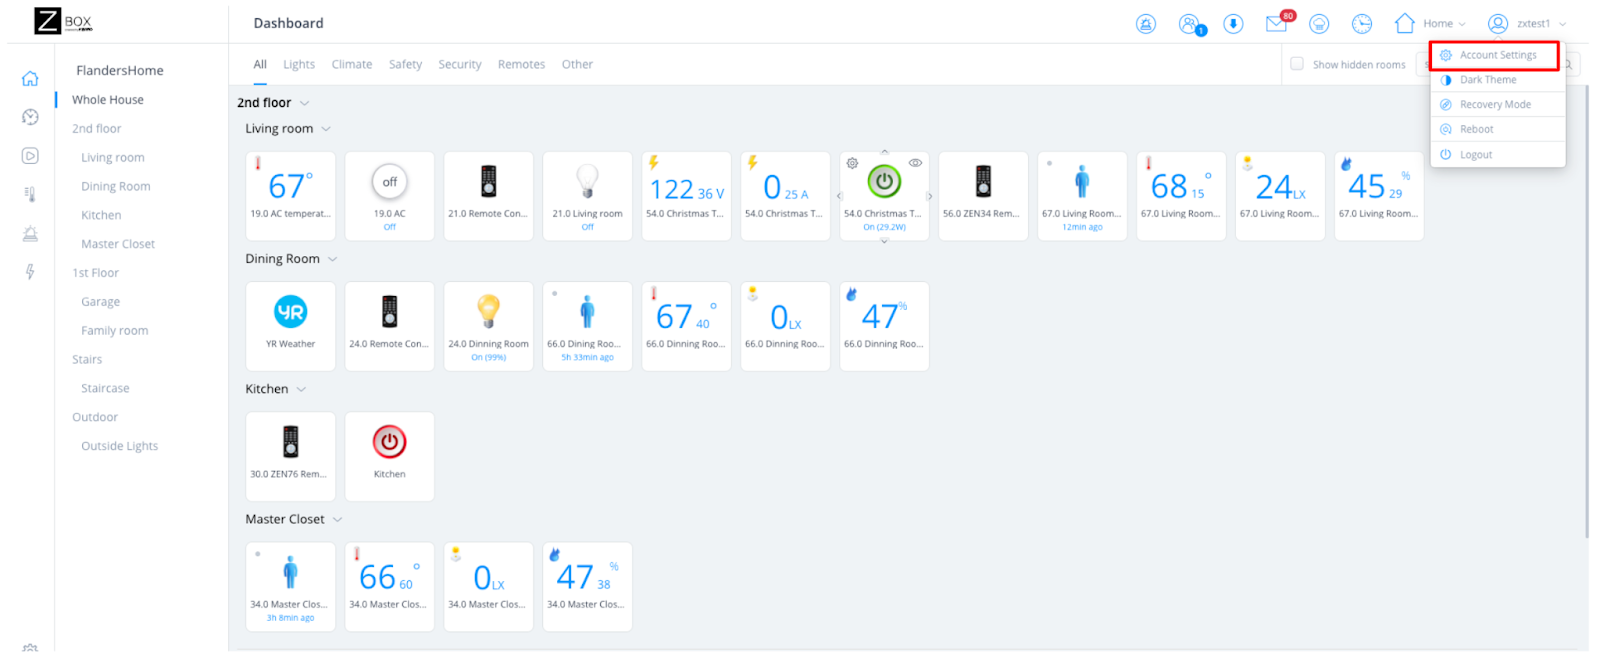
3. Enter your new PIN and check the box under it if you would also like the hub to require the PIN code when arming the system (and not just when disarming it).

4. Click Save. The new PIN will replace the system’s default 1111. Please make sure to store your PIN in a secure location.
HOW TO CREATE AN ALARM ZONE
1. Open the Z-Box Hub web interface and click on the Alarm icon on the top menu bar.

2. You will be redirected to the Alarm Setting menu. Click on Add Zone.

3. Provide a name the new alarm zone.

4. Select the sections, rooms, and/or devices you would like to include in your alarm zone, then click Save.

NOTE: By default, a newly created zone is disarmed. You can arm or disarm a zone from the web interface or from the mobile app in the alarm panel.

Devices and Rooms can trigger an alarm if the zone they are assigned to is armed.
Devices or Rooms will not trigger an alarm if the zone they are assigned to is disarmed. Arming a zone arms all devices in the selected zone while disarming it disarms all of the devices in the selected zone.
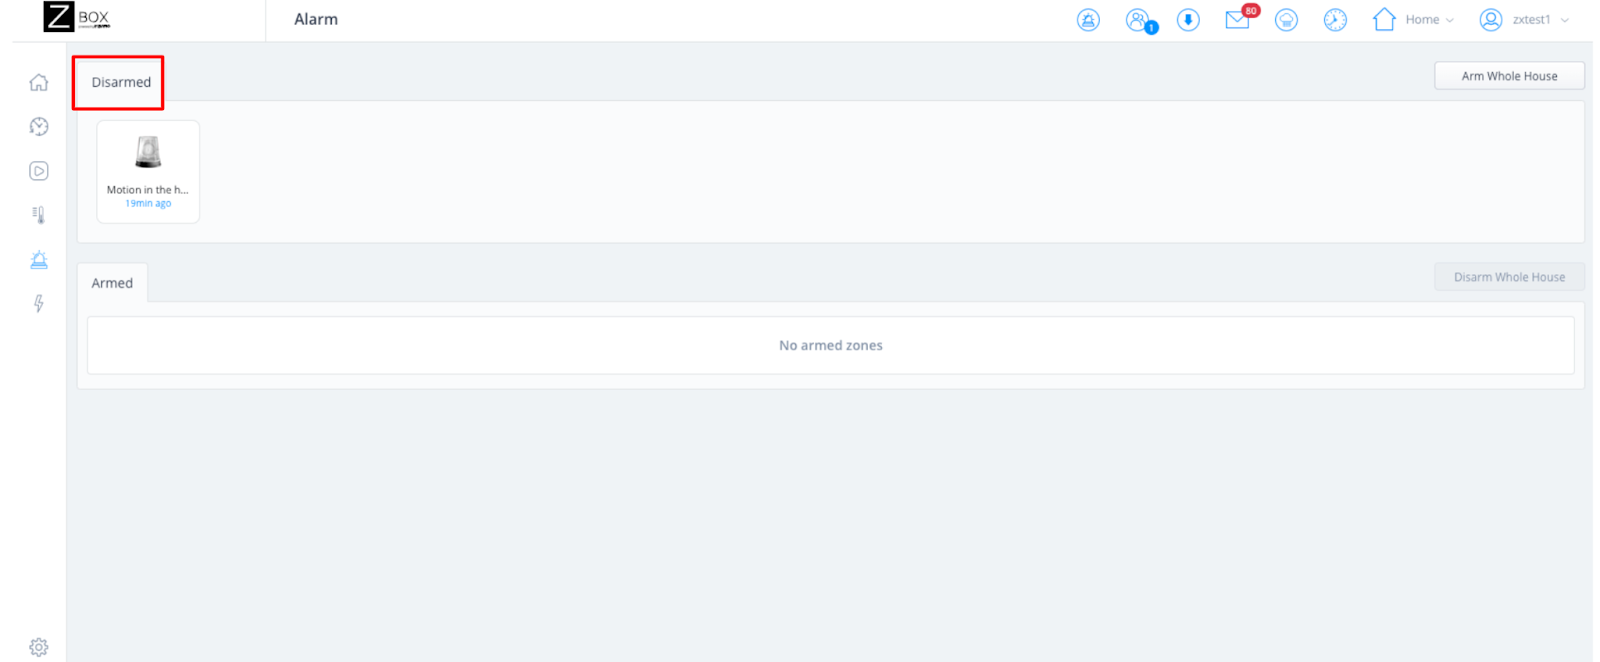
HOW TO ARM A SINGLE ALARM ZONE IN THE WEB UI
1. Click on the Alarm icon on the sidebar navigation menu in the Z-Box web interface.

2. Click on the zone tile you would like to arm.

3. The zone you selected will now move to the Armed section of the panel.

HOW TO DISARM A SINGLE ALARM ZONE IN THE WEB UI
1. Click on the Alarm icon on the sidebar navigation menu in the Z-Box web interface.
2. Click on the zone tile you would like to disarm. You will be asked to provide your security PIN. The default PIN is 1111. We recommend to set your own security PIN as described in the first section of this article.

To learn how to arm and disarm an alarm zone from your mobile app, please click here.
HOW TO ARM THE WHOLE HOUSE FROM THE WEB INTERFACE
1. Click on the Alarm icon on the sidebar navigation menu in the Z-Box web interface.
2. Click on the Arm Whole House button in the top right corner.

3. You will be asked to confirm that you actually want to arm the whole house. Click Yes to confirm or No to cancel.

4. All of the existing zones in the house are now armed and should display in the Armed section of the alarm panel.
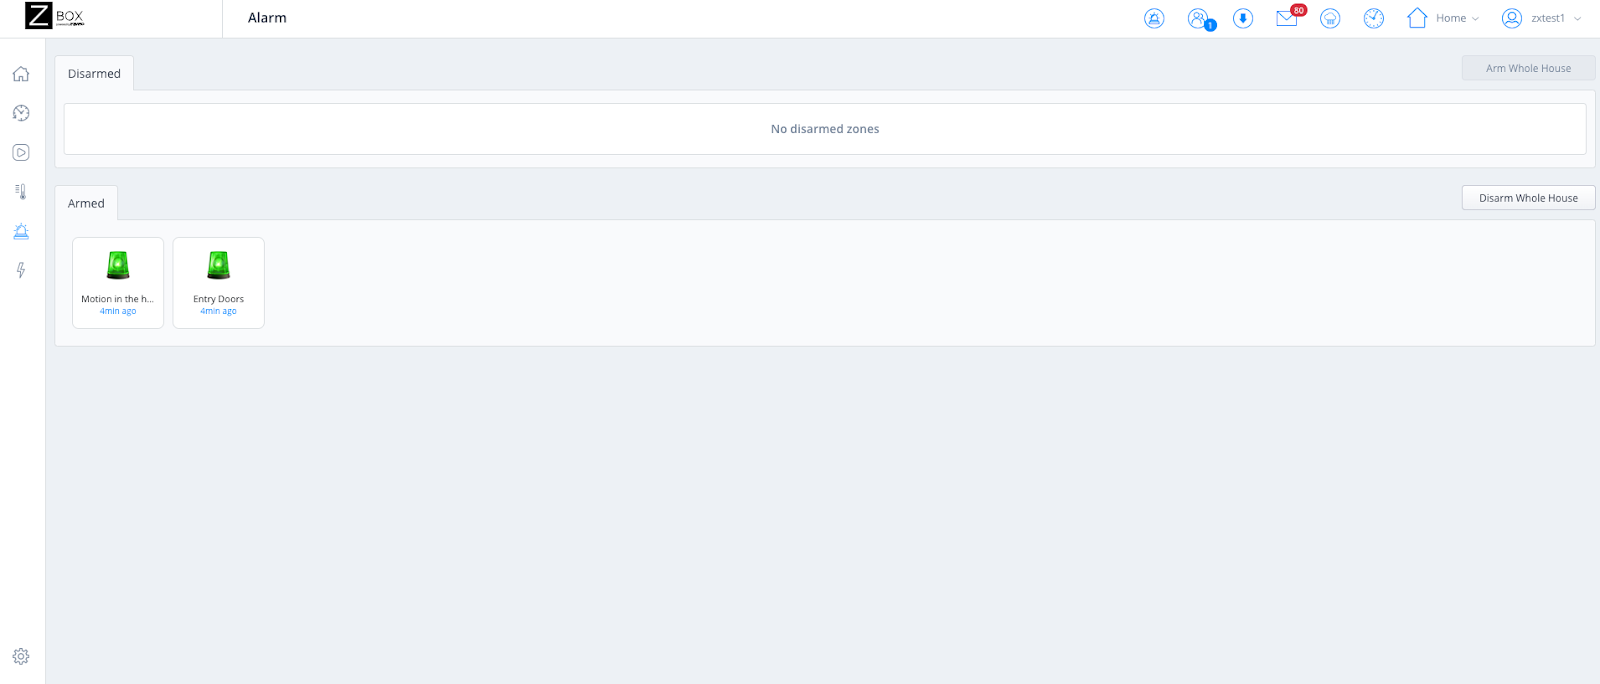
HOW TO DISARM THE WHOLE HOUSE FROM THE WEB INTERFACE
1. Click on the Alarm icon on the sidebar navigation menu in the Z-Box web interface.
2. Click on the Disarm Whole House button in the top right corner of the Armed section in the alarm panel.

3. You will be asked to provide your security PIN. The default PIN is 1111. We recommend to set your own security PIN as described in the first section of this article.

4. All the existing zones in the house are now disarmed and should display in the Disarmed section.

To learn how to arm and disarm the whole house from your mobile app, please click here.
HOW TO ARM OR DISARM A SINGLE ALARM ZONE FROM THE ALARM SETTINGS MENU
You can also manage alarm zones from the Settings menu in the WEB UI. Here is how to do that:
1. Open the Z-Box Hub web interface and click on the Alarm icon on the top menu bar.
2. You will be redirected to the Alarm Setting menu. Toggle the arming option to ON to arm the zone and OFF to disarm the zone of your choice.

HOW TO SET A DELAY FOR ARMING AND DISARMING AN ALARM
Exit delay is the amount of time you have to leave the house before the system is armed. Entry delay is the amount of time you have to disarm the system upon your return.
1. Open the Z-Box Hub web interface and click on the Alarm icon on the top menu bar.
2. Set the delay time for each zone. The value entered corresponds to the number of seconds for each delay.
- Entry delay - delay triggering the alarm so you can disarm it when you return home.
- Exit delay - delay triggering the alarm so you have enough time to leave the house before it's armed.
NOTE: Entry and exit delays for a given zone CANNOT be edited while the zone is armed or arming/disarming is still in progress.

3. Once you set your exit and entry delay, the alarm panel will display a countdown anytime before the system is armed or disarmed.

HOW TO EDIT AN ALARM ZONE
NOTE: A zone needs to be disarmed in order to be edited.
1. Open the Z-Box Hub web interface and click on the Alarm icon on the top menu bar.
2. Click on the Edit icon next to the zone that you want to make changes to.
3. Make appropriate updates and click Save. You can add or remove devices, rooms, and sections from your alarm zone as well as rename the zone.

HOW TO DELETE AN ALARM ZONE
NOTE: A zone needs to be disarmed in order to be removed. If you delete an alarm zone, the devices that were assigned to it remain added to your system and not removed from the hub. They're simply removed from the alarm zone.
1. Open the Z-Box Hub web interface and click on the Alarm icon on the top menu bar.
2. Click the Delete icon next to the zone that you want to remove.

3. Confirm the request to remove the time zone by clicking Delete.

4. The zone will be removed from the alarm zone list.

FORCE ARMING THE SYSTEM
If one of the security devices is currently triggered (e.g. door window sensor is open, or motion sensor is reporting motion), you will see a prompt to check the device status when trying to arm the system.
Click Cancel and check on the device. If the issue persists you can remove the device from the zone.

Questions about managing your Z-Box Hub Alarm Panel? Reach out to our team and we'll be happy to help!

